The camera calibration is an experimental feature, it is not yet available for general use.
Camera Calibration
Availability
iPhone spin measurement App
The iPhone spin measurement App does not yet include the Camera Calibration feature.
Android spin measurement App
The Android spin measurement App development version has the Camera Calibration feature.
It can be started in the measurement window hamburger menu with the button "Calibrate" in section camera.
General usage
- Use the experimental server.
- Optimize the camera placement well.
- The distance from the table needs to be very close.
- The default setting of 100 cm distance from the table edge to camera in upright position means 103 cm distance from table edge to tripod center due to the position offset of the camera holder.
- You can choose a different tripod placement on Android in the settings and adjust accordingly.
- On Android disable the automatic net detection and manually align with the net.
- The vertical center line needs to match the net very well.
- Move the tripod sideways that the camera is in line with the net.
- The camera of the smartphone in line, the tripod will be a hand's breadth right of the net line.
- The height of the tripod will be calibrated automatically.
- It can be a bit lower/higher.
- Tilt the camera that the calibration target is roughly in the vertical center.
- You can change the tilt later to better catch the balls.
- Small errors in the distance of the camera to the table will be partially compensated but the overall results will degrade in quality.
- The distance from the table needs to be very close.
- Set up the measurement as usual using a ball for focus and brightness adjustment.
- It needs good light and focus or else it will not find the calibration targets.
- You need a calibration target H48 or V87 (see below).
- Remove the ball and place the calibration target on the table.
- Open the hamburger menu (3 bars in top right corner) and scroll down to button "Calibrate" and click it.
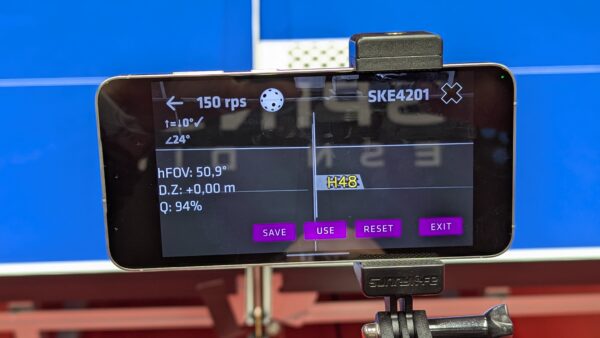
- It should automatically identify the calibration target and after a few seconds it should show the result.
- The result consists of the adjusted FOV and height.
- The adjusted values to not exactly match the real values.
- These values are chosen to optimize the accuracy of ball position measurement in the center of the table.
- The Q-Factor shows the quality of the dot alignment. It should be >90%.

- Click on "Use" to use this calibration for this session.
- Click on "Save" to save and use this calibration for all future sessions.
- Click on "Reset" to delete saved calibrations.
- Click on "Exit" to abort without saving/using this calibration.
- The ball position measurement (height at net and position on table) are now calibrated.
- You can tilt the smartphone up/down to better measure high balls.
- The camera position will automatically be adjusted accordingly.
- You can not move the tripod position or change the height.
- If you changed position or height, you need to run the calibration again.
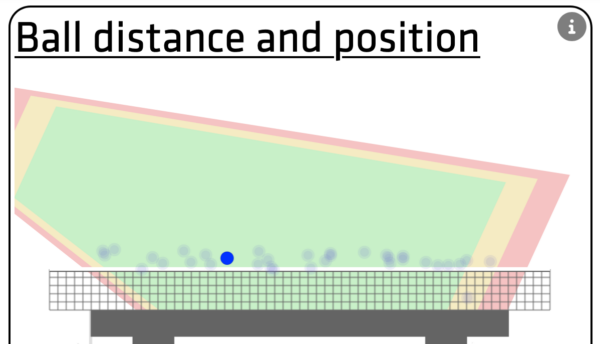
- Use the "Measurement Quality" page in Experimental to verify the ball position.
- This is how serves across the whole table width should look like:

- This is how serves across the whole table width should look like:
Calibration Targets
General info
- We have PDF files that you can print out yourself.
- You need to use 100% scaling on A4 paper for correct dimensions.
- Scaled printing will lead to wrong sizes.
- On the paper are two 100 mm distance lines marked to check the dimensions.
- They both need to be within 99..101 mm length for good results.
- Measure these lengths to verify that your print is good.
- Do not use prints with wrong sizes for calibration.
- We have horizontal and vertical targets
- The horizontal targets can be placed directly on the table.
- The vertical targets need an additional stand to hold them vertical.
- The paper targets need to be flat.
- No wrinkling, folding or bending allowed.
- With the standard camera placement where the camera is looking down, you can use the horizontal target.
- When the camera is on net height, you need to use the vertical target.
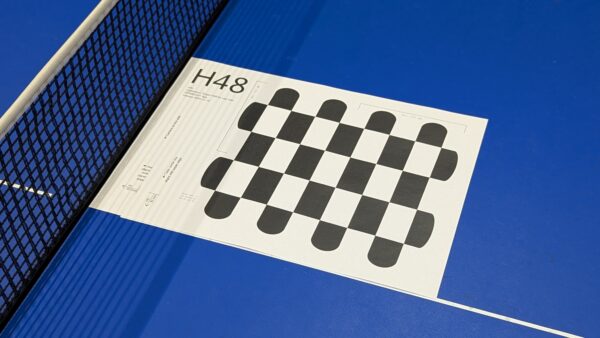
H48
The H48 target is a tilted checkerboard for horizontal placement on the table.
Placement
Right of the net behind the center line.

File
PDF for printing: SPINSIGHT_H48_v241210
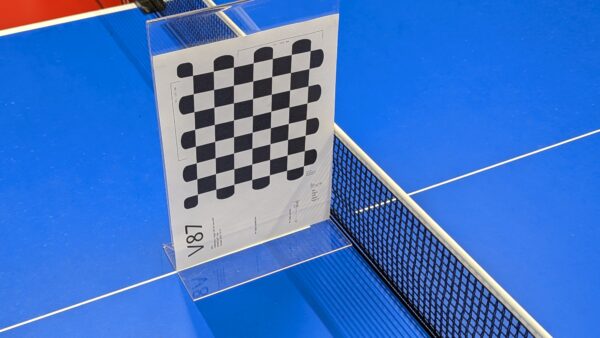
V87
The V87 target is a tilted checkerboard for vertical placement on the table using a stand.
Placement
Left of the net on top of the center line on a vertical stand.

File
PDF for printing: SPINSIGHT_V87_v241210
