
This page is for the development version of our Android SPINSIGHT beta App Prototype. v202510a
"SPINSIGHT beta" Android App Prototype Help
The Android App named "SPINSIGHT beta" is an development prototype that we use for technology development.
We now have an official SPINSIGHT App for Android in the Google Play store - it can view data and manage player profiles but it cannot measure.
You can use an iPhone with the official SPINSIGHT App for iOS in the Apple App Store to measure.
The rest of this page is relevant only for the Android beta App.
Getting started
For a quick introduction see our separate page: Getting Started
Installing the App on Android
The development App is available in some regions as Closed Beta. More details here: Getting Started
First start
The app will ask for acceptance of our terms and conditions.
Differences between Android App and iPhone App
Development stage
- iPhone: The App is in late beta stage and features a polished user interface.
- It is intended for general use.
- Android: The App is a development prototype and has no guided user interface.
- It is intended for use by tech-savvy users.
Supported Hardware
- iPhone: The supported models generally work quite reliably.
- Older models may also work but are unsupported.
- Android: Every smartphone model and individual smartphone can be different.
- No general rules for support can be given.
- Check each phone individually.
- Phones that work well today may stop working in the future.
User Support
- iPhone: Normal user support for the supported device models.
- Android: We cannot give user support for the Android App.
- If it works for you, you can use it.
- If it doesn't work, you can report the bugs but we cannot spend much time to make it work for you.
Measurement window
- iPhone: All supported iPhones have a similar measurement window that covers the whole table width in the default placement.
- Android: The Android phones in general only support reduced image resolution and depending on the lens and measurement settings.
- Depending on the specific camera and settings it may or may not cover the whole table width and it may require a placement closer to the table.
Measurement latency
- iPhone: The measurement generally has low latency and the App can measure long fast ball exchanges without problems.
- Android: Depending on the specific device, temperature and battery status, the results may be delayed and some measurements in fast ball exchanges may be dropped.
Light requirements
- iPhone: The measurement usually works well from around 300 Lux.
- Halls with 500-1000 Lux provide good measurement conditions.
- Android: Generally Android needs more light.
- On newer phone models 300 Lux are usually enough for serves but fast balls require more light.
- Usually 600 Lux are good but older models can require more than 1000 Lux for good measurement of fast balls.
Settings
GET CAMERA PERMISSION
Visible if camera permissions are missing. Click on the button and then allow camera access.
If access has been denied repeatedly you need to grant it manually in the app settings.
RUN TESTS
Before using the device you need to run some tests. Click on the button and then click Start in the popup window. The tests may take a few minutes.
OFFLINE
The device is offline. Check your internet connection.
START
This button is visible if the device is ready for the measurement. Click to start the measurement.
User level
Depending on the user level we show more or less options. The following user levels are available:
- Basic - after everything is already set up and users just want to START the measurement.
- Advanced - options most users need to set up the device.
- Expert - additional options some users need.
Ball Type
Depending on the type of ball that you have, you need to set the settings.
- SPINSIGHT ball - the official printed spinsight ball.
- This offers high precision measurement.
- Normal Ball - works with any ball but does not support spin measurement.
Measurement Range
Depending on the ball type, smartphone capabilities and other settings, different measurement ranges can be selected.
- 150 rps, 90 km/h
- Default mode.
- 100 rps, 60 km/h
- If 150 rps is not available or doesn't work well.
- Saves Battery.
- 75 rps, 45 km/h
- For training serves.
- Works with lower light.
- Can handle flickering lights better.
- Saves Battery.
Server
You can change the server setting to access the experimental server:
- Stable
- The default setting.
- Experimental
- New features, some bugs, sometimes offline.
Feature Keys
Here some special features can be enabled by adding some text.
- FULLFPS - Only use full 120/240 FPS instead of adjusted frame rates.
- elite - The elite-ball becomes selectable.
Measure Light Level
Starts the light measuring mode, see section Light.
Video Resolution
Optional setting the video resolution.
- Auto - the default setting for your device.
- HD - The default resolution (1280x720).
- FullHD - Bigger resolution (1920x1080). This offers a larger measurement window but needs more processing power and is problematic on many devices.
External Lens and Effective horizontal field of view
Use the camera calibration mode to auto-detect the FOV values. See: Camera Calibration
Mains Frequency
Frequency of the electrical grid. All of Europe has 50 Hz, North America has 60 Hz, Japan is mixed.
This setting is used in the 75 rps measurement range to reduce the problems with flickering lights.
Disable Flicker Detection
Activaing this switch will disable the flicker detection.
Critical Battery Level
The battery level percentage at which the measurement stops. If a power supply is connected the measurement works even below this level.
The default value is 20 percent. Some older phones with weak batteries are unstable at higher levels. If you experience system crashes increase this level or connect a power supply to the phone.
The "Battery Low" warning starts 10% above "Critical Battery Level" - between 20% and 30% by default.
When the phone is charging you can measure at any battery level.
Skip Camera Setup Dialog
Enabling this will directly go to the measurement. This is useful when doing repeated measurements in the same location.
Ball Detection for Focus
- Auto - Default setting. Ball detection in the focus screen is enabled.
- Off - Don't use ball detection to help with focus setting.
Skip Feedback Dialog
Enabling this will skip the feedback dialog after the measurement session.
Default is enabled.
Enable Remote Control
Enabling this will allow other devices such as the Web-Frontend on the Tablet to send commands to this device. Necessary to Start & Stop the measurement from the Web-Frontend on the tablet.
Default is disabled.
Remote Control Permssions
Enter the device IDs of the devices that are allowed to send commands. Other devices will be ignored.
Enable all devices to send commands by entering * here.
On the frontend settings you may see the frontend device ID in the form SW1234 or XW1234.
Position Settings Preset, X, Y, Z, R
The camera position is necessary for the measurement window display and position based measurements.
The default Preset "Auto" is for the SPINSIGHT tripod.
There are other presets for placement closer to the table (50 instead of 100 cm) and on net height for better ball height measurements with good background.
The "Custom" preset enables editing X, Y, Z, and R.
Default values for a tripod 170 cm camera height and 100 cm from the table edge:
- X: 0.0
- Y: -1.0
- Z: 0.94
- R: 0.07
For more details on position adjustments see the Camera Calibration page here: Camera Calibration
Open Privacy Agreement
Opens the privacy agreement page that you agreed to in a browser.
Reset Device Identity
This will reset the device identity and it will give your device a new broadcast ID. The display devices you have connected in the past (via QR-code or link sharing) will not receive new measurement data. You will have to reconnect them.
This can be used if you do not want others to see your new measurement data.
Send Optional Usage Data
If this option is enabled it will send data about how the app is being used and errors to a database. We use this data to improve the app experience and fix bugs. Sending this data is optional.
Device Nickname
Optional name for the device that can be used when managing multiple measurement devices.
Phone placement
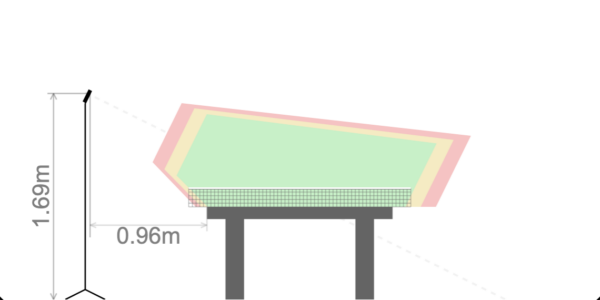
The default placement of the phone for measurement with SPINSIGHT balls is on a tripod 170 cm from the floor, next to the table 100 cm from the table edge looking down at the table.
On the Frontent in the experimental page "Measurement Quality" (available on the experimental server) you can see your placement and the measurement area that your smartphone covers. On an iPhone with 1080p resolution it usually looks like this and covers the whole table width:
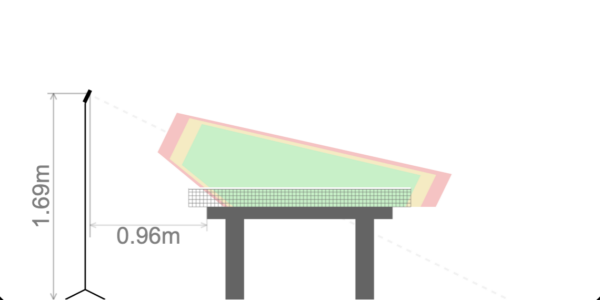
On most Android Smartphones with HD (720p) resolution where the 1.6x zoom setting work, the 1 m distance is usually working but the tilt needs to be adjusted a bit upwards to cover the whole table. The measurement area then looks like this:
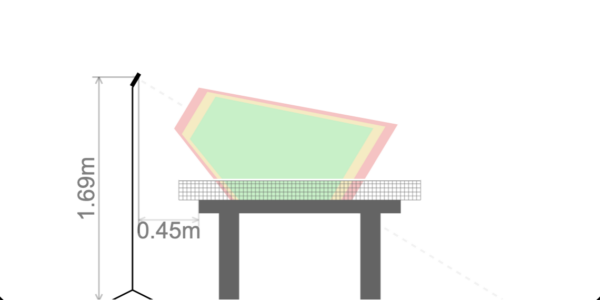
On Smartphones with HD (720p) resolution where the 1.6x zoom is not working, the smartphone needs to be closer to the table. There the preset with 0.5 m distance helps to cover the central area over the table:
It's best to switch to the Experimental server and then visit the page "Measurement Quality" when you do your first setup.
General Requirements
- Enough good light.
- 300 Lux minimum.
- 600 to 1000 Lux recommended.
- >10000 Lux many phones have problems.
- Light not flickering.
- A dark and steady background.
- The TT-table, a dark floor, a dark wall, dark boundaries, dark cloth.
- The ball has to pass through the measurement window.
- Minimum and maximum distance between ball and camera. The range depends on smartphone and settings.
- The ball must be visible in the camera image.
Starting the Measurement
Focus Mode
Place the ball on the table before you start the measurement. The app assumes that a ball is on the table at about 10 cm from the net and center line. If the Aimbot is enabled (enabled is the default setting) it will automatically search for the ball.
With the button "Adjust Focus" you can enter the focus mode.
- Place a ball on the table next net slightly behind the center line.
- Ensure that the ball is in the circle in the center of the screen.
- Push the "Auto" button to activate autofocus.
- Manual adjustment if "Auto" fails to produce good results.
- Adjust the ISO value with +/- Buttons such that Light is "Good".
- Adjust the Focus distance with +/- Buttons such that the image has best sharpness.
- Exit via the OK button.
The values are stored and readjusting focus is usually only required if you change the measurement mode or location.
Check the measurement window
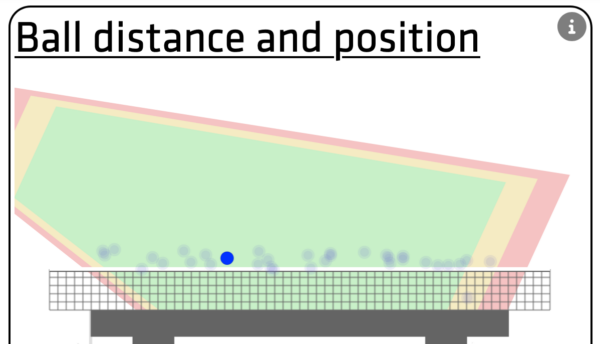
Go to the experimental page "Measurement Quality" and play a few balls.
On this page you find detail information about the measurement like ball placement, distance to the camera, light&focus quality etc.
You can adjust the tilt of your smartphone (up or down) to optimize the placement of the green area.
If you want to move the tripod closer to the table you first need to update the tripod position in the settings and then restart the measurement.
Result display
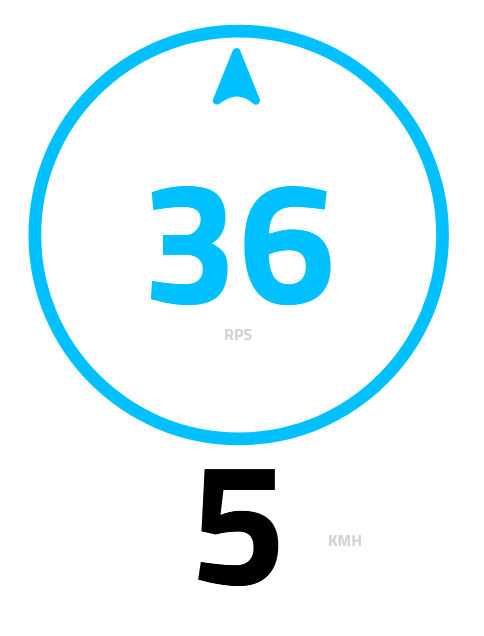
The result consists of three major components
- spin amount in rps (rotations per second)
- spin axis - an arrow that shows in which direction the ball rotates
- speed amount in km/k (kilometers per hour)
In the integrated view we show the spin amount inside the circle with an arrow for the spin axis. The speed amount is below the circle.
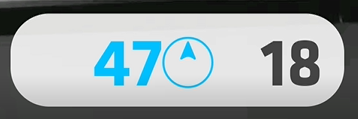
In the single line view we show the spin amount next to the circle with the arrow and the the speed amount.
Spin amount
The spin amount is given in rotations per second (rps).
In order to get rotations per minute (rpm) you multiply this number by 60. E.g. 150 rps = 9000 rpm
Typical values for amateur players are
- 20-60 rps for service with top-spin,
- 20-40 rps for service with back-spin,
- 40-60 rps for kick-kick,
- 60-120 rps for top-spin returns.
Spin axis
The spin axis arrow shows in which direction a dot in the center of a ball would move if you stand behind the ball and watch as it flies away from you.
For a ball with top-spin the dot would move up and vice versa for a ball with back-spin the dot would move down.
For a ball with left/right spin the dot would move left/right.
If the spin axis is not clear (e.g. only low spin or a high amount of corkscrew spin) there will be no arrow shown.
Spin colors
The spin number and axis may be colored according to this scheme
- cyan - top-spin
- magenta - back-spin
- purple - side-spin (right or left)
- grey - other spin
When the spin axis is not clear (e.g. only low spin or a high amount of corkscrew spin) it will show grey.
Speed amount
The speed amount is given in kilometers per hour (km/h).
In order convert it to miles per hour multiply this value by 0.62. E.g. 50 km/h = 31 mph.
Typical values for amateur players are:
- 5-15 km/h for slow service,
- 20-30 km/h for fast service,
- 30-50 km/h for kick-kick,
- 40-60 km/h for top-spin returns.
Left and right player
The left player is on the left side as seen from the camera of the measurement smartphone. If you are not sure about the sides, simply play a ball and see which side updates the numbers.
Using a second device for result display
You can connect another device to the server to show the measurement results.
Sharing the link
In the main menu and in the hamburger menu there is a QR-code that you can scan with your second device. Alternatively the link can be shared via some messenger app.
On your display device, the page opens in the web browser and it will show the live results for both sides.
Sound Feedback
In the hamburger menu you can adjust the sound settings.
Notifications
General notification messages like "Ready", "Online", "Offline" etc.
Player Side
Play the sound for the left and/or right player.
Usually only one player side is enabled and the coach/robot side is disabled.
Sound Type
Beep changes pitch with the value. Useful for repeated strokes and general feedback.
The Voice reads the value. Useful for service training in a calm environment.
Value Type
Choose between sound feedback on Speed and Spin.
Appendix
Light measurement
The app has a light measurement tool integrated that uses the smartphone light sensor.
This light sensor is only available on Android smartphones but not on iPhones. If you have an iPhone for spin measurement, you can ask somebody else to install the SPINSIGHT beta App on an Android smartphone for light measurement.
Start via "Measure Light Level" in the settings menu.
Place the phone on the table and read the illumination value.
Android:
- below 300 Lux - Measurement will probably not work
- 300 to 600 Lux - Low speed modes should work
- 600 to 1000 Lux - High speed modes should mostly work
- 1000 to 10000 Lux - All modes should work reliably
iPhone:
- below 100 Lux - Measurement will probably not work
- 100 to 200 Lux - Serves work on some iPhones
- 200 to 300 Lux - Serves should work well
- 300 to 1000 Lux - All balls should work well
- >1000 Lux - Sometimes the ball is too bright for measurement, depends on individual situation
For alternate smartphone placements the light measurement at different angles can be useful.
Error messages
When the ball detection encounters an error a message will be displayed. Errors caused by a passing ball are displayed on the side where the ball came from. Other errors are displayed in the center.
- Too close - the ball was too close to the camera.
- Try to play the ball a bit further away from the camera.
- Place the camera closer to your playing area.
- Too far - the ball was too far from the camera.
- Try to play the ball a bit closer to the camera.
- Place the camera closer to your playing area.
- Too fast - the ball was too fast for a successful measurement.
- Play the ball a bit slower.
- Increase the measurement range in the configuration menu.
- Too slow - the ball was too slow for a successful measurement.
- Play the ball a bit faster.
- Spin too high - the detected spin exceeds the measurement range.
- Ensure that the ball has dots.
- Ensure that the ball being played matches with the ball settings.
- Play the ball with less spin.
- Increase the measurement range in the settings.
- Too dark - the ball was too dark.
- Adjust the ISO.
- Check the light conditions and increase the light.
- Too bright - the ball was too bright.
- Adjust the ISO.
- Outdoors: Go to a shaded area without direct sunlight.
- Too blurry - the focus is not good.
- Restart the measurement and adjust the Focus.
- Wrong Ball - the detected ball type can't be used for measurement.
- Check if you accidentally used a normal ball without dots.
- Processing error - the data processing did not produce good results.
- Check the camera placement.
- Check the background.
- Ensure that the ball being played matches with the ball settings.
- Offline - your device has no connection to the server.
- Check the internet connection.
- Measurement is displayed but no sound is being played
- Check the player side configuration in the hamburger menu.
- Check the other sound settings.
- No ball detection at all
- Check if the measurement is actually running.
- Check if the ball is actually passing through the measurement window.
- Check the camera placement.
- Check the background.
- Adjust focus distance and ISO.
- Check the internet connection.
- Restart the App.
Typical Problems
The app crashes after an update was installed
- Some old configuration is not supported in the new version.
- Uninstall and Install the app.
- Delete the app data in the Android App Info screen.
Not all measurement ranges can be selected
- The measurement range selection depends on the result of "Run Tests".
- Start "Run Tests" again and see if it shows 240 FPS.
- If the maxiumum FPS is lower than 240 FPS your Android device cannot support the full measurement range.
- When selecting "FullHD" at "Video Resolution" the FPS may be lower than at the "HD" setting.
- Select "Auto" at "Video Resolution"
My device doesn't seem to work
- Many Android devices do not support high speed video properly.
- Check the result of "Run Tests" on your device.
- Check your device using the speed measurement at 90 km/h before you invest into additional equipment.
- Huawei, Oppo and Xiaomi smartphones are usually problematic and may be unable to measure even if the test result itself looks good.
- Samsung A-series phones usually don't support high speed video.
- Best results are with top line Google Pixel and Samsung Galaxy S-series phones.
The device shows "OFFLINE" instead of "START"
- The device has no connection to the server.
- Check your internet connection.
- Sometimes the server may be offline or the wrong server is selected.
- Activate "User Level" "Expert" and check the "Server" setting.
- The server "Production" should always work.
The connected display device does not show results
- Your display device may be offline.
- Try to reload the page.
- Sometimes the browser disconnects the data connection.
- Reload the page.
- The measurement may have stopped.
- Check if the measurement device itself is actually working.
- Check if the measurement device has low battery.
- Restart the measurement.
- The broadcast ID may have changed.
- Check if the broadcast ID on measurement and display device match.
- Reconnect using the QR code or share link function.
The measurement stopped because of low battery
- The measurement device will show the "LOW BATTERY" warning and then stop at the critical battery level.
- Connect a power supply (powerbank or charger) to your device.
- Restart the measurement.
The smartphone randomly crashes/reboots during the measurement
- Some older smartphones have stability issues when running from battery.
- Connect a power supply (powerbank or charger) to your device.
- Change the "Critical Battery Level" in the settings to a higher value.
The smartphone is getting hot
- We are using a lot of processing power which means that the smartphone will get hot. This can lead to automatic throttling or in extreme cases to shutdown of the app to prevent overheating. Android phones all have different characteristics so each phone may react differently. Newer high end phones with good thermal management should not show these problems.
- General tips to reduce heat:
- Limit the active measurement time, turn off the measurement during breaks and let it cool down.
- Provide good cooling. Remove phone cases that trap the heat.
- Avoid hot environments. Avoid direct sunlight.
- Don't charge the phone while measuring. Or charge battery to 100% before the measurement and keep the charger attached.
- Use HD instead of FullHD resolution to reduce required processing power.
- Use a lower Measurement Range e.g. 75 rps instead of 150 rps to reduce required processing power.
- Use WiFi instead of Mobile data.
- Don't use your measuring phone as a Hotspot.